Integration: Zoom

Sylvester @ FixAppt.com
Last Update há 5 anos
To start creating virtual services and online events, follow the steps below to integrate Zoom with your FixAppt account.
With the integration in place, both customers and employees will automatically receive unique Zoom meeting links for every Zoom appointment/event in their confirmation emails.
As of the time of writing this, a free Zoom plan allows unlimited one-on-one meetings with no time limit, and group meetings not exceeding 40 minutes.
Third-party integration instructions can become outdated from very recent changes at the integration partner. If you are having trouble following the steps below, please open a support ticket for assistance.
Zoom Integration Steps
1. Sign up or Sign in to Zoom – if this is your first time on Zoom you will need to sign up for a new account. In the Zoom signup confirmation email, follow the link to setup your password and skip the steps for adding new members for now. After that you will be redirected to your Zoom Profile.
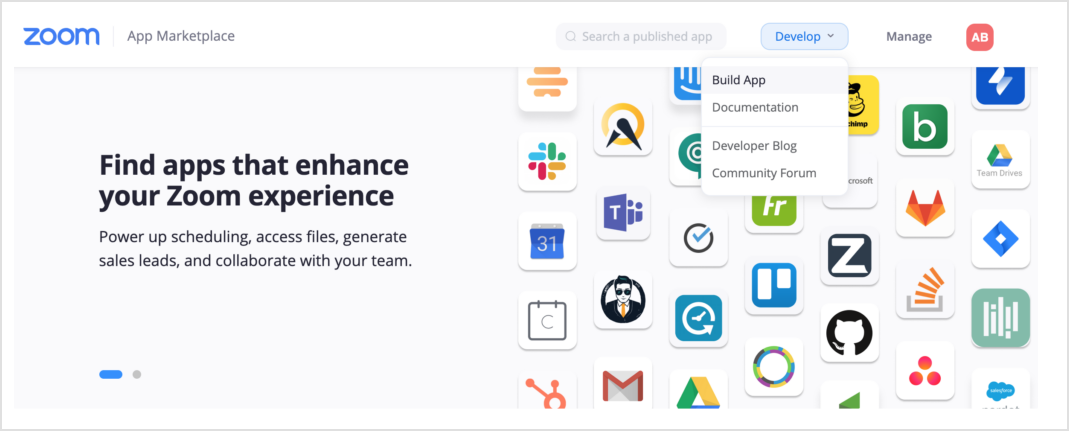
2. Visit Zoom App Marketplace – Next, visit the Zoom App Marketplace at https://marketplace.zoom.us/ and sign in with your Zoom account details.
3. Create your App – Click on "Develop" and choose "Build App".
4. Choose your App type – Next, choose the first option "JWT". Click “Create” and you will see a popup to give your App a name. Enter a name and click “Create” once again.
5. Basic Information – Here you will have to fill three required fields (the rest are optional). In "Basic Information" add your company name, and in "Developer Contact Information" add your name and email address and click “Continue”.
6. App Credentials – Next, click “Copy” in the “API Key” field. Then go back to your FixAppt dashboard and navigate to Settings > Business > Integrations > Zoom. Paste the “API Key” you copied into the “Client Key” field. Then go back to your Zoom App, copy the “API Secret” and paste it into the “Client Secret” field. Click “Save” and your Zoom account should now be connected to your FixAppt account.

Zoom Settings In FixAppt
Settings > Business > Integrations > Zoom
Before creating new Zoom services and events, there are a couple of settings you can configure.
Meeting Title – Here you can set what you want your meeting titles to be. You can enter a static title to be used for all Zoom sessions, or you can use the placeholder %reservation_name% to dynamically set each title to match the service or event name. You can also combine more than one placeholder, with or without any additional text, to create the title. All available placeholders can be found at Settings > Email Templates (click on “Show Email Placeholders” to reveal the list).
Meeting Agenda – Similar to the above, you can keep the default setting - %reservation_description% in this case - or set your own description to be used for all Zoom sessions.
Create Meetings For Pending Appointments – Here you can choose whether you want Zoom meetings to be created for Pending appointments or not. By default this option is disabled which means that Zoom meetings will be created only for appointments with Approved status. You can ignore this if your appointments and events are automatically Approved.
Creating Zoom Services
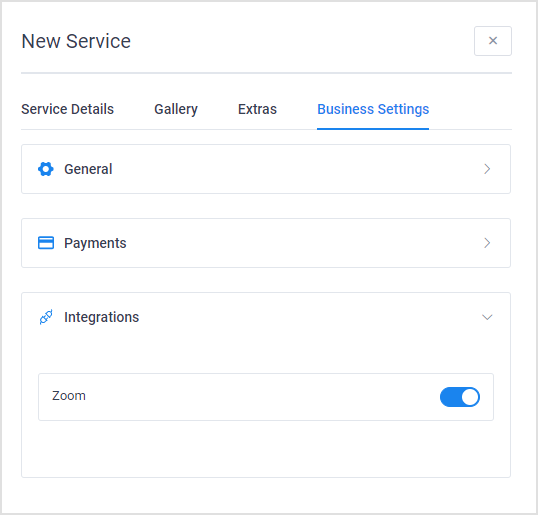
Enabling Zoom for a Service – To create a service that will take place on Zoom, simply activate the "Zoom" toggle button found in the "Business Settings" tab, under "Integrations".
You must also select a Zoom User (even if you have only one) for each Employee that will be assigned to Zoom-based services. The next section will show you how.
Linking Zoom User to Employees
Link an Employee to a Zoom User (Host) – If the Zoom integration is done correctly, you should be able to see a "Zoom User" dropdown selection field in every employee's settings page. To enable Zoom for an employee, select a Zoom User and click "Save".
All Zoom appointments booked under the employee will now be automatically hosted by the connected Zoom User. The corresponding Zoom session details and links will be automatically included in the email confirmations sent to both the customer and the employee the appointment was booked under.

Link an Event to a Zoom User – You should be also able to see the same "Zoom User" dropdown selection field in the settings page of an Event. Select the desired Zoom User (if there is more than one) and click "Save". This will set the selected Zoom User as the host for the event.
The "Zoom User" dropdown fields will only appear if the Zoom integration is setup correctly.
Multiple Zoom Users for Multiple Concurrent Meetings
Do you need to hold more than one Zoom session concurrently? If yes, follow the steps below to create additional Zoom users (hosts).
As of the time of writing this, hosting more than one meeting concurrently requires a paid Zoom plan.
Create Additional Zoom Users (as required) – Login to your account at Zoom, click on “User Management” in the left sidebar and then click on “Users”. Now click on the "+ Add Users" button. The popup for adding user will appear. Enter the email address in the first field and choose Basic as User Type and click “Add”. Add as many Zoom Users as your business requires.

All the Zoom Users in your Zoom account should now be available for selection in the Employee and Event "Zoom User" dropdown field.
Zoom Meeting Links in Email Notifications
Zoom link placeholders are already included in the default email templates which are automatically sent to your customers and employees when a Zoom-enabled service or event is successfully booked. Zoom links can also be found in the booking's details in the backend dashboard and in the frontend employee and customer portals.
Listed below are the four Zoom link placeholders for your reference:
For Services
%zoom_join_url% – link for customers to join the meeting (service appointment).
%zoom_host_url% – link for the employee to join as host for the appointment.
For Events
%zoom_join_url_date_time% – link for customers to join the event.
%zoom_host_url_date_time% – link for the employee to join as host for the event.
Zoom placeholders will be automatically converted to clickable URL hyperlinks, so use them as-is without any surrounding text.